Healthy Neck
21. Use a forearm rest

A forearm rest can reduce the load on your shoulders by supporting your forearms (not your wrists or elbows) when using the computer. Several ergonomic forearm rest styles are available online. Choose one that doesnt lock you into a single posture. If youre using the arm rests on your chair arm but are experiencing discomfort, try removing the arm rests. They can sometimes place your arms in an awkward position or put pressure on the nerves in your elbows. Make sure to support only your arm weight on the forearm rest, and not your full upper body weight.
22. Dock your notebook
When using a notebook computer over long periods of time, attach it to a docking station and use an external keyboard and mouse. If you dont have a docking station, you can raise the height of your notebook screen to eye level and then plug in a USB keyboard and mouse. When youre away from your desk, consider using a notebook mouse instead of the mouse built into your notebook. Check out the wired and wireless notebook mouse devices designed by Microsoft.
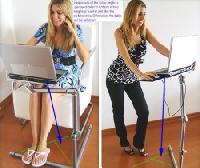
23. Use a sit stand workstation
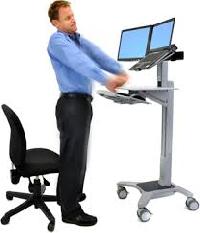
Try using an adjustable sit/stand desk that supports neutral postures. It lets you adjust the height of your work station to accommodate both sitting and standing positions.
24. Forward Flexion

Allow your head to fall forward so that your chin approaches the top of your chest. Once you feel a stretch or pull in the muscles that line the back of your neck or once the joints of your neck wont allow you to bend forward any further, whichever comes first, hold this position for as long as is comfortable, up to 30 seconds.
25. Backward Extension
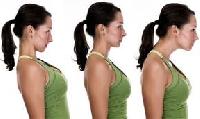
Allow your head to bend backwards so that you can look at the ceiling or sky. Once you feel a stretch or pull on the front side of your neck or once the joints of your neck wont allow you to go back any further, whichever comes first, hold this position for as long as is comfortable, up to 30 seconds.
26. Rotation to Right

With your shoulders facing forward, turn your head to your right. Once you feel a stretch or pull anywhere in your neck or once the joints of your neck wont allow you to rotate any further, whichever comes first, hold this position for as long as is comfortable, up to 30 seconds.
27. Lateral Flexion to Right

With your shoulders facing forward, allow your head to fall toward your right shoulder so that your right ear approaches the top of your right shoulder. Once you feel a stretch or pull along the left side of your neck or when your neck wont allow any further lateral flexion, hold this position for as long as is comfortable, up to 30 seconds. Be sure that your left and right shoulders remain level; for some people, theres a natural tendency to bring the right or left shoulders up while doing this stretch.
28. Lateral Flexion to Left

Repeat the same steps described above, but with your head falling toward your left shoulder. Remember to keep both shoulders level; its your head that should bend down to approach your shoulder, not your shoulder thats raised to approach your head.
29. Take It Easy

If youre like most people, you probably live a busy, hectic life. But if youre living with cervical disc disease and have increased neck pain from injury or muscle pain, its important to temporarily ease back on intense activities. While you are resting, find a comfortable position one that causes you the least amount of neck pain. You can place a rolled up towel or a pillow under your neck to help keep your neck in a neutral position. Resting doesnt mean crawling into bed and remaining perfectly still, however. Staying immobile for more than a day or two actually can be harmful because it can decondition the muscles that support your neck and actually increase neck pain in the long run. While your neck is healing, adjust your activity level to what you can comfortably handle. As you improve, gradually increase your activity level back to normal.
30. Apply Cold/Heat
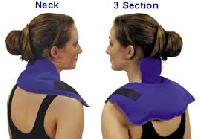
People often face the hot/cold conundrum: Which one should you use? Generally, the recommendation is to use ice for the first 24 to 48 hours after an injury to reduce swelling, followed by heat to loosen muscles and improve stiffness. But with cervical disc disease, neither heat nor cold is going to penetrate deeply enough to actually relieve the inflammation, so use whichever feels best. Regardless of whether you choose cold or heat, keep it on for only about 20 minutes at a time and then leave it off for at least 40 minutes. Wrap the ice or heat source in a towel never put it directly against your skin or you could wind up with a nasty burn.