

Use zone focusing
Essential Photography Tips


Use zone focusing
Related to point 6 f/8 and be there if you have a lens with both f stop and focal measurements on the barrel, understanding how they relate to each other can help you take great spontaneous photos with a high degree of confidence.
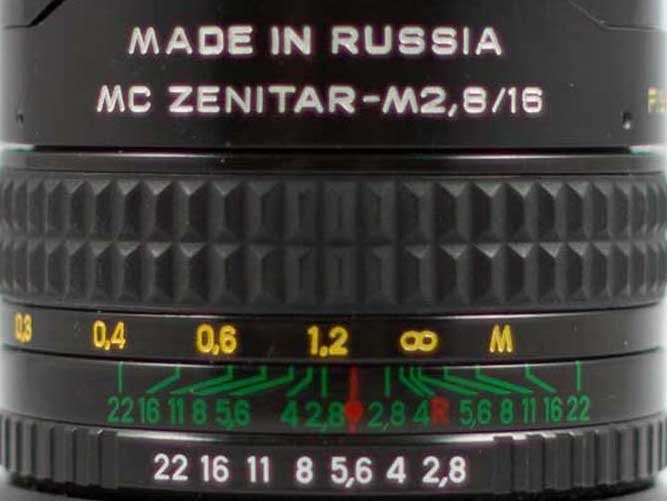
In the image below we ve set our aperture to f/5.6, as indicated by the red line pointing to the 5.6 reading on the lower gauge. We ve then set the range on the yellow gauge to around 1.2 metres by positioning this at the top of the same line. We can now use the green scale to understand how far away from the camera our subjects need to be if they are to be accurately focused.By following the lines running from the two green entries for 5.6 on either side to their measurements on the yellow scale, we can see that so long as we re more than 1m away from our subjects they will be in focus (the green 5.6 on the left is linked to around 1m on the yellow scale, while the green 5.6 on the right is linked to the infinity symbol, which is like a number 8 on its side). Anything closer than that will be blurred.
This gives us a great deal of freedom to snap whatever we want without making any further adjustments, so long as it s no closer to us than 100cm. To create a more intimate effect, adjusting the distance ring so that 0.4 sat at the top of the red marker would mean that only those objects between around 36cm and 50cm would be kept in focus.Use zone focusing to understand which parts of your image will be in focus at any particular aperture setting.
 Polish the material gathered into an excellent presentation as opposed to one that is good enough
 Don t be a memory cheapskate
 What are some of the most common mistakes people make when putting together a portfolio
 Shoot for free
 Flickr your shopping assistant
 Travel without a tripod tip 3
 Show only the best work
 Save money by opting for a smaller sensor
 Should you keep several different portfolios tailored to specific purposes
 Don t be dictated by the sun
 What kind of pictures should you include in your portfolio
 f/8 and be there
 Test your English Language
  Success Tips For Students
 Rules to play Gymnastics
 Vasant Panchami Rules to play Paint Ball
 Weird and Wonderful Amazonian Wildlife Spookiest Abandoned Places
 New Year Poems The Rules of Stretching
 Hug Day Top Sports Rivalries of All Time Fitness Stretching Easy Vastu tips for your home New Lotus flower Tattoo Designs
 Xmas Activities For Kids Best Foods to Eat to Gain Muscle Grooming Tips
 Guglielmo Marconi
 Guru Nanak Dev